Eclipse Tips: Ant Builder
I’ll freely admit that knowing about this Eclipse feature earlier would have saved me a lot of time and frustration. Whatever IDE you use, the problem is getting enough flexibility in how you build a project. Its development structure is often completely different from the build output, such as a WAR. We can use Ant, but running it by hand isn’t efficient. This tip shows how to add an optional Ant script as a project builder that runs automatically when a file is saved.
Take a small example web application. Its project has directories for source files, JSP pages and configuration files.
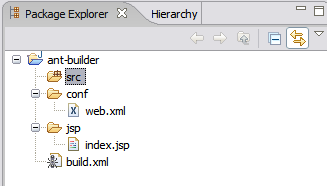
Say we want to build a project with this structure into a WAR. We’ll write a simple Ant build script and put it in the project’s root. The build output will go straight to the application’s deployment directory on the target server.
<?xml version="1.0"?>

<project name="Ant builder" basedir="." default="build">

 <property name="build.path" value="c:\tools\tomcat\webapps\test.war" />


 <target name="build" >


 <copy todir="${build.path}/WEB-INF/classes" preservelastmodified="true">

 <fileset dir="bin">

 <include name="**/*.*"/>


 <copy todir="${build.path}" preservelastmodified="true">

 <fileset dir="jsp">

 <include name="**/*.*"/>


 <copy todir="${build.path}/WEB-INF" preservelastmodified="true">

 <fileset dir="conf">

 <include name="**/*.*"/>


 <target name="clean" >

 <delete dir="${build.path}" failonerror="no"/>
Set this build file as a new project builder. Go to Project >> Properties >> Builders >> New.
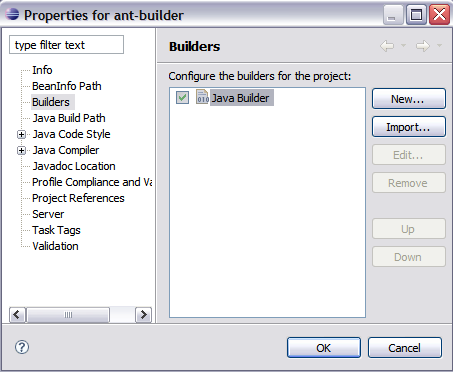
In the next dialog, Choose configuration type, select Ant build.
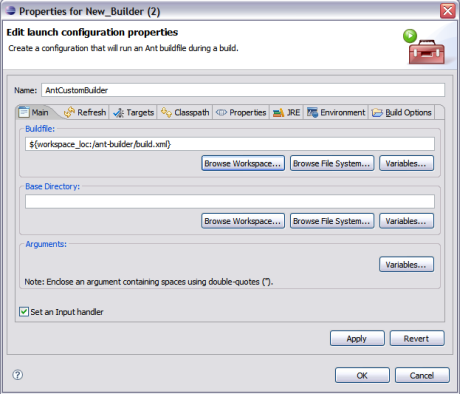
This takes you to the properties for the new builder. On the Main tab, set Buildfile to the Ant script you chose.
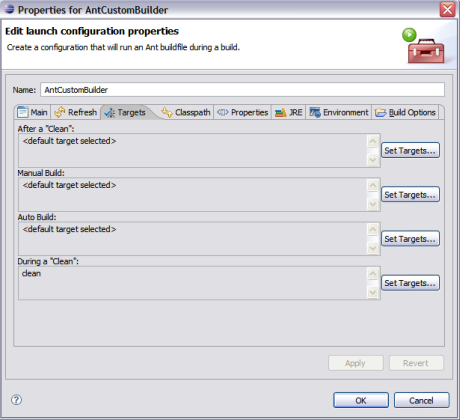
The next tab we need is Targets. Here you choose which Ant targets to run for different Eclipse events: After Clean, Manual Build, Auto build and During Clean. The default comes from the target marked as such in the selected Ant script.
In the script above, the default target is build, which suits us. We still need to use Set targets for Auto Build and During Clean. Auto Build is especially important because Eclipse triggers it whenever you save any file in the project.
That’s all we need. Saving a file in the project will now automatically run the Ant target we assigned to Auto Build.
Optimization tips
As you’ve probably noticed, there are plenty of other tabs in the builder. The JRE and Build options tabs offer a few useful ways to tune it.
- If you have multiple interdependent projects with Ant builders, set the JRE tab to Separate JRE instead of Run in the same JRE as the workspace. Without this setting, parallel cleans of my projects caused trouble.
- If the log in the console gets annoying on every build, clear Allocate Console on the Build options tab.
- The Build options tab can also run builds in the background. Select Launch in background.
- If you don’t want Ant to run every time any file in the project is saved, select Specify working set of relevant resources on the Build options tab. Use Specify resources to select the directories or files whose saves should trigger Auto Build and the configured Ant target.
If Ant isn’t running, make sure Project >> Build Automatically is checked.
Medium version · Archived original page
Related articles
Related CZ Podcast episodes
- #261 · Leadership
On leading people and teams. · Czech audio
- #3 · Java 6 SE, Vývoj webových aplikací
Dagi and Filemon discuss Java 6 and web application frameworks. · Czech audio
- #1 · Vývojová prostředí v Javě
The first CZ Podcast episode looks at Java development environments. · Czech audio