Setting Up a JBoss Cluster Step by Step

Want to test your web application in a cluster, or just try a cluster out? If so, this guide will walk you through setting up a JBoss cluster step by step. I reckon it should take no more than fifteen minutes.
You can run the cluster described below on a single computer. There’s no need for several machines, although you can follow the same steps if you want to run each node on a separate machine. In some cases, a cluster on a single computer is useful in its own right. For example, Windows limits how much memory it can allocate to a single process. You can get around that limit by running a cluster on one machine.
Installing JBoss
First we need to install JBoss. I recommend downloading and running the installer. When asked to select an installation group, choose all to install JBoss with clustering support. Leave all the other settings at their defaults. In the rest of this guide, JBOSS_HOME refers to the JBoss installation directory.
Creating the cluster nodes
Once JBoss is installed, we’ll create a cluster with two nodes.
Inside JBOSS_HOME\server you’ll find the default directory. Make two copies of it in the same directory, naming them node1 and node2. You’ll then have three directories in JBOSS_HOME\server: default, node1 and node2.
In JBOSS_HOME\server\node1\conf\jboss-service.xml and JBOSS_HOME\server\node2\conf\jboss-service.xml, uncomment the following bean.
<mbean code="org.jboss.services.binding.ServiceBindingManager"
     name="jboss.system:service=ServiceBindingManager">
In that same configuration file for the second node, also change
<attribute name="ServerName">ports-01</attribute>
to<attribute name="ServerName">ports-02</attribute>
Uncommenting this bean tells JBoss to use a different set of ports. Two JBoss servers couldn’t run side by side on the same machine if both used the default ports. Instead, they use the ports defined in ${jboss.home.url}/docs/examples/binding-manager/sample-bindings.xml. That file defines different sets of ports under the keys ports-01 and ports-02. That’s why we configured the second node to use a different set.
Startup scripts
Next, we’ll create scripts to start each node.
In JBOSS_HOME\bin, create a file named node1.bat and put the following in it: run -g dagi -u 228.1.2.199 -c node1.
In JBOSS_HOME\bin, create a file named node2.bat and put the following in it: run -g dagi -u 228.1.2.199 -c node2
On Linux, use *.sh, of course.
The g parameter specifies the partition name. A partition defines which nodes belong to the same cluster. Our two nodes use the same partition name because they belong to the same cluster. The u parameter specifies the UDP multicast address the nodes will use to communicate with one another.
You can choose your own multicast address, as I did with 228.1.2.199. It must be the same for every node in your cluster. If a colleague on the same network is also trying out JBoss clustering and chooses the same partition name and multicast address, their node will join your cluster. So choose the partition name and multicast address carefully.
To test the cluster configuration, start node1.bat and, once it’s running, start node2.bat. You can also do it the other way around. Start order doesn’t matter in a JBoss cluster because all the nodes are peers. There’s no controller node to start first. Once the second node starts, the log of the node you started first should show something like this.
22:48:52,250 INFO  [dagi] New cluster view for partition dagi (id: 1, delta: 1)
: [10.0.0.3:1199, 10.0.0.3:1299]
22:48:52,250 INFO  [dagi] I am (10.0.0.3:1199) received membershipChanged event:
22:48:52,250 INFO  [dagi] Dead members: 0 ([])
22:48:52,250 INFO  [dagi] New Members : 1 ([10.0.0.3:1299])
22:48:52,250 INFO  [dagi] All Members : 2 ([10.0.0.3:1199, 10.0.0.3:1299])
Setting up the load balancer
We have a cluster now. Next we need to put a load balancer in front of it to distribute incoming HTTP requests across the cluster nodes. This diagram from the original JBoss documentation shows what the load balancer does when a node goes down.
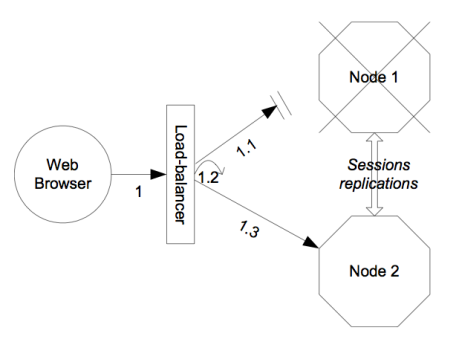
JBoss uses Tomcat as its HTTP server. Since Tomcat supports mod_jk, we can use the Apache HTTP Server as our load balancer.
Let’s get started!
Installation
I recommend downloading compatible versions of mod_jk and Apache. I downloaded mod_jk-apache-2.2.3 and the Apache 2.2.3 installer. You can use the default settings when installing Apache itself. Just make sure the default HTTP port, 80, is free. Another server such as IIS or some other program may already be using it. We’ll refer to the Apache installation directory as APACHE_HOME.
After installation, copy the downloaded mod_jk-apache-X.Y.Z.so to APACHE_HOME\modules and rename it to mod_jk.so.
Configuring Apache
Add the following line Include conf/mod-jk.conf to the end of APACHE_HOME\conf\httpd.conf.
Create APACHE_HOME\conf\mod-jk.conf and give it the following contents.
# Load mod_jk module
# Specify the filename of the mod_jk lib
LoadModule jk_module modules/mod_jk.so

# Where to find workers.properties
JkWorkersFile conf/workers.properties
# Where to put jk logs
JkLogFile logs/mod_jk.log
# Set the jk log level [debug/error/info]
JkLogLevel info
# Select the log format
JkLogStampFormat "[%a %b %d %H:%M:%S %Y]"
# JkOptions indicates to send SSK KEY SIZE
JkOptions +ForwardKeySize +ForwardURICompat -ForwardDirectories
# JkRequestLogFormat
JkRequestLogFormat "%w %V %T"
# Mount your applications
JkMount /application/* loadbalancer
# You can use external file for mount points.
# It will be checked for updates each 60 seconds.
# The format of the file is: /url=worker
# /examples/*=loadbalancer
JkMountFile conf/uriworkermap.properties# Add shared memory.
# This directive is present with 1.2.10 and
# later versions of mod_jk, and is needed for
# for load balancing to work properly
JkShmFile logs/jk.shm
# Add jkstatus for managing runtime data<Location /jkstatus/>
JkMount status
Order deny,allow
Deny from all
Allow from 127.0.0.1
</Location>Create APACHE_HOME\conf\uriworkermap.properties and give it the following contents.# Simple worker configuration file# Mount the Servlet context to the ajp13 worker
/jmx-console=loadbalancer
/jmx-console/*=loadbalancer
/web-console=loadbalancer
/web-console/*=loadbalancer/test/*=loadbalancer
/test=loadbalancerThis tells the load balancer which subpaths to route. In other words, it forwards any HTTP request tohttp://hostname/jmx-consolenebo http://hostname/web-consoleorhttp://hostname/testto one of the nodes in our cluster. JBoss comes with the jmx-console and web-console applications. I’ve also added a mapping for a test application. To try it with an application, deploy it to JBoss under the test context. You can also map an existing application by specifying its context.
Next, and we’re nearly done, create APACHE_HOME\conf\workers.properties and give it the following contents.# Define list of workers that will be used
# for mapping requests
worker.list=loadbalancer,status# Define Node1
# modify the host as your host IP or DNS name.
worker.node1.port=8109
worker.node1.host=localhost
worker.node1.type=ajp13
worker.node1.lbfactor=1
worker.node1.cachesize=10# Define Node2
# modify the host as your host IP or DNS name.
worker.node2.port=8209
worker.node2.host=localhost
worker.node2.type=ajp13
worker.node2.lbfactor=1
worker.node2.cachesize=10# Load-balancing behaviour
worker.loadbalancer.type=lb
worker.loadbalancer.balance_workers=node1,node2
worker.loadbalancer.sticky_session=1
#worker.list=loadbalancer# Status worker for managing load balancer
worker.status.type=statusNote the valuesworker.node1.portandworker.node2.port. These are the ports that the JK connector in JBoss’s Tomcat listens on.
Configuring Tomcat inside JBoss
The last thing we need to do is configure Tomcat and its mod_jk support.
InJBOSS_HOME\server\node1\deploy\jbossweb-tomcat55.sar\server.xml, find theEngineelement and add the attribute jvmRoute="node1". The element should look like this:
<Engine name="jboss.web" defaultHost="localhost" jvmRoute="node1">InJBOSS_HOME\server\node2\deploy\jbossweb-tomcat55.sar\server.xml, find theEngineelement and add the attribute jvmRoute="node2". The element should look like this:
<Engine name="jboss.web" defaultHost="localhost" jvmRoute="node2">InJBOSS_HOME/server/node1/deploy/jbossweb-tomcat55.sar/META-INF/jboss-service.xmlandJBOSS_HOME/server/node2/deploy/jbossweb-tomcat55.sar/META-INF/jboss-service.xml, change the contents of theattributeelement with the attributenameand valueUseJKtotrue.
<attribute name="UseJK">true</attribute>That’s it. Our cluster and its load balancer are ready.
If anything is unclear, I recommend checking these steps against the original JBoss documentation, specifically section 16.5, HTTP Services, in chapter 16, Clustering.
Testing the cluster
- Start Apache.
- Start node 1.
- Start node 2.
- Open your browser and enter http://localhost/web-console/. If Apache is listening on a port other than 80, specify that port. By default, the web console is protected by the username and password you entered while installing JBoss.
- In the right-hand frame of the web console, look for
Running config: 'XXX'. If you open http://localhost/web-console/ several times and clear your cookies or use a different browser instance between requests, you should occasionally land on a different node. You’ll see the label switch fromRunning config: 'Node1'toRunning config: 'Node2'and back again.
If the browser always reaches the same node, even after you clear the cookies or use a different browser instance, something’s wrong. Otherwise, congratulations. Your JBoss cluster is up and running. Next time I’ll explain why we cleared the cookies, how sticky sessions work, and how to make an application replicate HttpSession automatically.
This article would never have happened without Gal Marder, VP of R&D at InterBit.
Thank you very much, you are the real Java champion!
Medium version · Archived original page
Related articles
Related CZ Podcast episodes
- #261 · Leadership
On leading people and teams. · Czech audio
- #3 · Java 6 SE, Vývoj webových aplikací
Dagi and Filemon discuss Java 6 and web application frameworks. · Czech audio
- #1 · Vývojová prostředí v Javě
The first CZ Podcast episode looks at Java development environments. · Czech audio