Mini-tutorial: developing JSPs and servlets with Eclipse and Tomcat
A question that often comes up in Java discussion groups is how to develop JSPs and servlets in Eclipse. Eclipse has no built-in support for JSPs, servlets or deploying to a servlet container. You need a plug-in for that.
I wrote this for developers just getting started, so we’ll use the Sysdeo Eclipse Tomcat Launcher plugin. That assumes you already have the Tomcat servlet container installed.
Configuring the Sysdeo Eclipse Tomcat Launcher plugin
Once you’ve installed the Sysdeo Eclipse Tomcat Launcher plugin,
configure it.
Window >> Preferences >> Tomcat
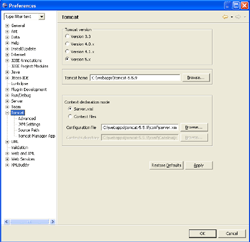
- Tomcat version — Select the installed version of Tomcat.
- Tomcat home — Select the Tomcat directory.
Window >> Preferences >> Tomcat >> Tomcat Manager App
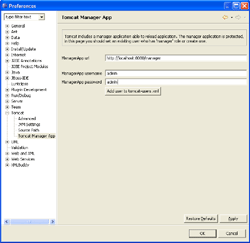
Tomcat Manager App is a web application for administering the applications running on Tomcat. For instance, you can reload an individual application without restarting Tomcat.
For Tomcat 5.x, the ManagerApp URL takes the form http://server:port/manager. Choose a ManagerApp username and ManagerApp username, then click Add user to tomcat-users.xml.
New project
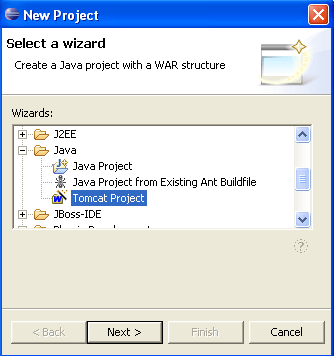
First create a new project using the project wizard added by the Sysdeo Eclipse Tomcat Launcher plugin.
File >> New Project >> Java >> Tomcat Project
Choose a project name and, if you want, the directory where it should be saved.
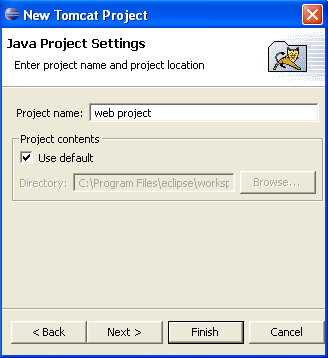
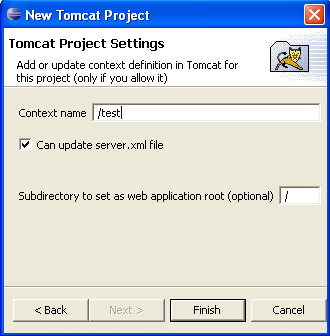
Context name is the application’s context name in the container. It corresponds to the context part of the URL. If you use test as I did, for example, your URLs will always start with http://server:port/test/*.
The project is ready. Create a test JSP
page named index.jsp and put it in the project root.
<%@ page language="java" contentType="text/html; charset=UTF-8"
    pageEncoding="UTF-8"%>
<!DOCTYPE HTML PUBLIC "-//W3C//DTD HTML 4.01 Transitional//EN">
<html>
  <head>
  <meta http-equiv="Content-Type" content="text/html;
charset=UTF-8">
  <title>Hello world</title>
 </head>
 <body>
   Hello world
 </body>
</html>
Create a servlet too, in WEB-INF/src/test.
package test;import java.io.IOException;
import javax.servlet.ServletException; import javax.servlet.http.HttpServlet; import javax.servlet.http.HttpServletRequest; import javax.servlet.http.HttpServletResponse;
public class HelloServlet extends HttpServlet { protected void doGet(HttpServletRequest req, HttpServletResponse
res) throws ServletException, IOException { res.getWriter().print(“<html><body><p>Hello servlet world</p></body></html>”); } }
To map the servlet to a particular URL, create web.xml in the WEB-INF directory.
<?xml version=“1.0” encoding=“UTF-8”?>
<!DOCTYPE web-app PUBLIC ’-//Sun Microsystems, Inc.//DTD Web

Application
2.3//EN’ ‘http://java.sun.com/dtd/web-app_2_3.dtd’>
<web-app>
<servlet>
<servlet-name>HelloServlet</servlet-name>
<servlet-class>test.HelloServlet</servlet-class>
<load-on-startup>1</load-on-startup>
</servlet>
<servlet-mapping>
<servlet-name>HelloServlet</servlet-name>
<url-pattern>/helloservlet</url-pattern>
</servlet-mapping>
</web-app>
Everything is ready now. You can start Tomcat without deploying the application separately. For example, the IDE toolbar has three new icons for controlling the “tomcat.”
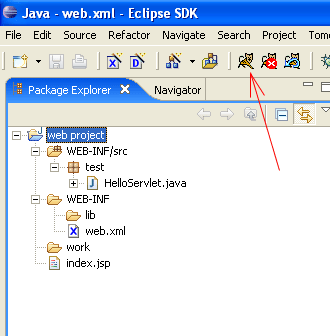
Once Tomcat starts, you should see output in the IDE console. Test it in your browser at http://localhost:8080/test/index.jsp and http://localhost:8080/test/helloservlet.
Right-click the project and select Tomcat project for several useful commands. The most useful is reload context, which you can use after changing the source. JSPs are recompiled automatically.
The Sysdeo Eclipse Tomcat Launcher plugin starts Tomcat in debug mode, so you can debug as usual in Eclipse. Hot code replace also works. In some cases you can use the plugin with a project that wasn’t created as a Tomcat Project. See project properties >> Tomcat.
Download the test project
Useful links in Czech
- Series on JSP — JavaServer Pages for everyone
- Series on servlets — Java Servlets
Medium version · Archived original page
Related articles
Related CZ Podcast episodes
- #3 · Java 6 SE, Vývoj webových aplikací
Dagi and Filemon discuss Java 6 and web application frameworks. · Czech audio
- #1 · Vývojová prostředí v Javě
The first CZ Podcast episode looks at Java development environments. · Czech audio